Grok Privacy Settings Guide

Table of Contents
Though I use Grok from time to time, I haven’t really thought much about Grok’s privacy settings.
So when I decided to learn more, I was quite surprised at how many privacy settings there are.
Here’s what I learned, and which settings I ended up changing. Maybe you’ll want to do the same.
What Data Does Grok Use?
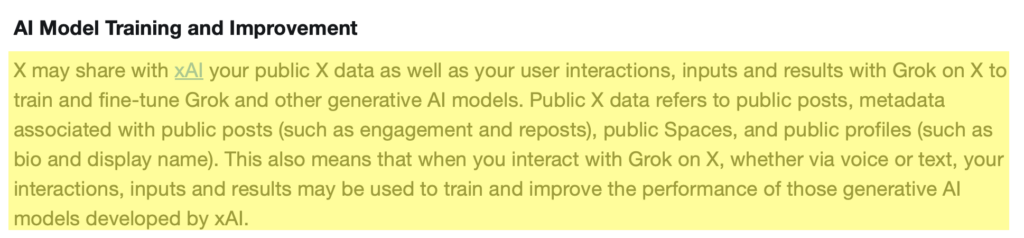
When you use Grok on X, the following may be used to train and fine-tune Grok and xAI’s other generative AI models:
- Your interactions with Grok on X, i.e., your inputs and the results, whether you use voice or text.
- Your public X data, which includes your public posts, the metadata attached to them (such as engagement and reposts), public Spaces, and public profile details like your bio and display name.
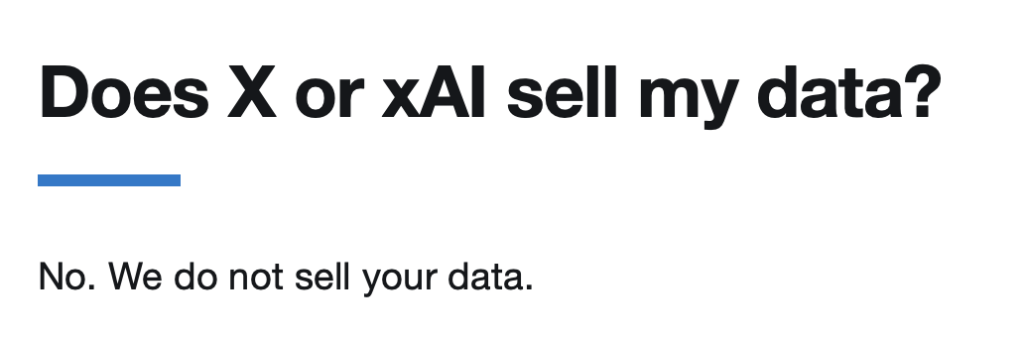
Grok says that it does not sell user data.
How to Opt Out of Grok Model Training
If you don’t want Grok’s AI models to train on your data, here’s how you can turn this setting off.
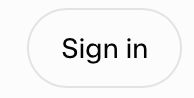
1. Log in to your Grok account
Go to https://grok.com/.
Click the “Sign in” button in the upper right corner to log in to your Grok account.
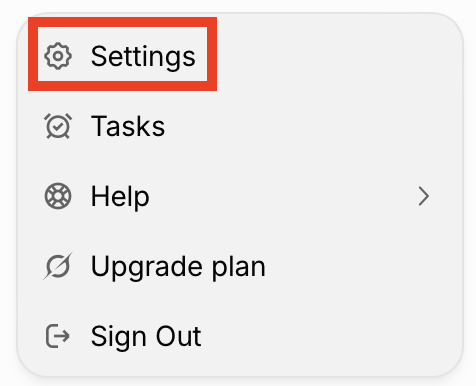
2. Click your profile name and “Settings”
Click your profile name in the bottom left side.
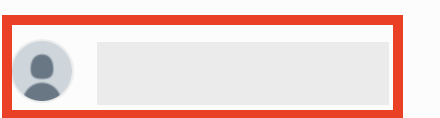
A pop-up menu will appear. Select the “Settings” link.
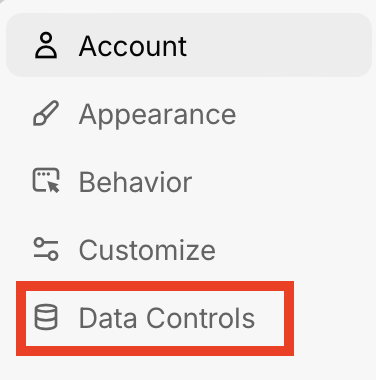
3. Click “Data controls”
Select “Data controls” from the left side menu.
Toggle off ‘Improve the Model’
Check if the toggle next to the ‘Improve the Model’ setting is on or off.
If the setting is toggled on, toggle it off.

That’s it!

Your Grok activity (i.e., the things you type, the conversations you have, and the answers Grok gives you) will no longer be used for training Grok AI models going forward. Anything already used in earlier training cannot be pulled back out of the model.
Note: Some features on X aren’t Grok-the-chatbot but are still “powered by Grok” under the hood, like the recommendation system that decides what posts to show you. The opt-out doesn’t switch those off from learning about you. So even after you opt out, those features keep learning from how you use them.
The feedback exception
Even if you’ve opted out of Grok model training, that opt-out doesn’t cover feedback you choose to give.
So if you hit thumbs up or thumbs down on a Grok answer, you’re actively volunteering that conversation on purpose. xAI can then use that conversation (and related data) to train and improve Grok.
How to Stop X Using Your Public Twitter Data for Grok AI Training
X automatically feeds your public posts and profile information into xAI’s Grok.
Below, we walk through how to opt out of this setting.
1. Sign in to your X account
Visit https://x.com/.
Log in to your X account.
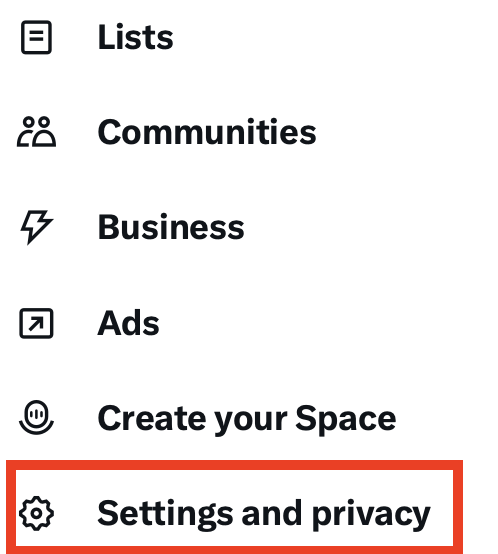
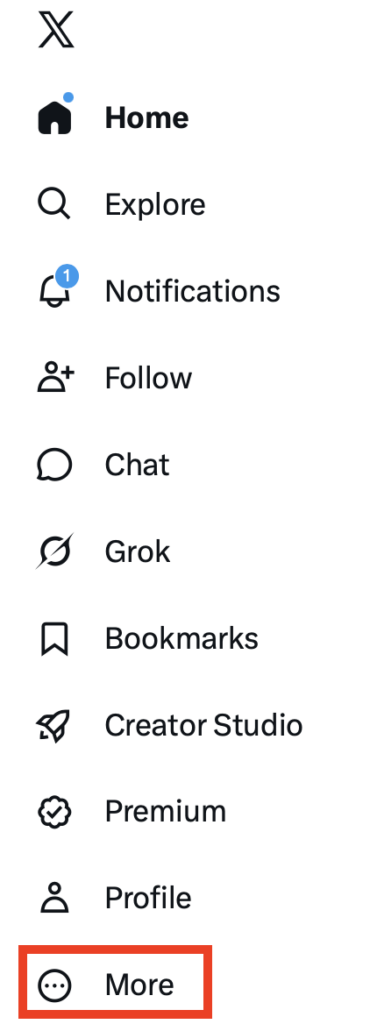
2. Select “More” and then click “Settings and privacy”
Click “More” from the left-side menu.
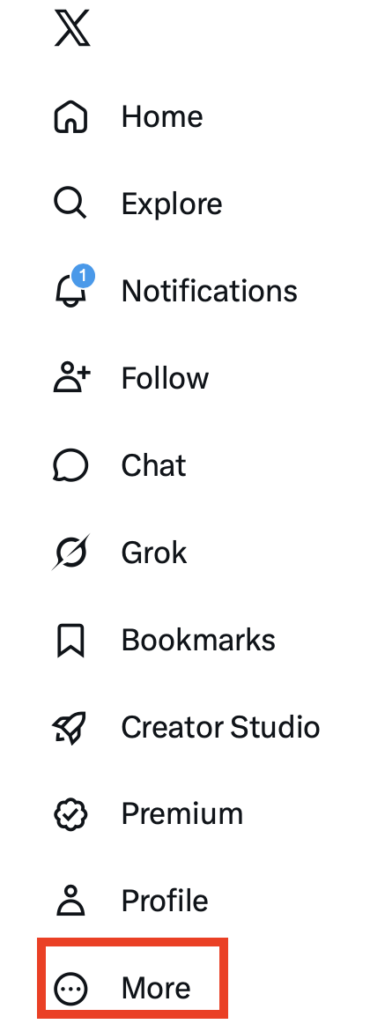
Click “Settings and privacy.”
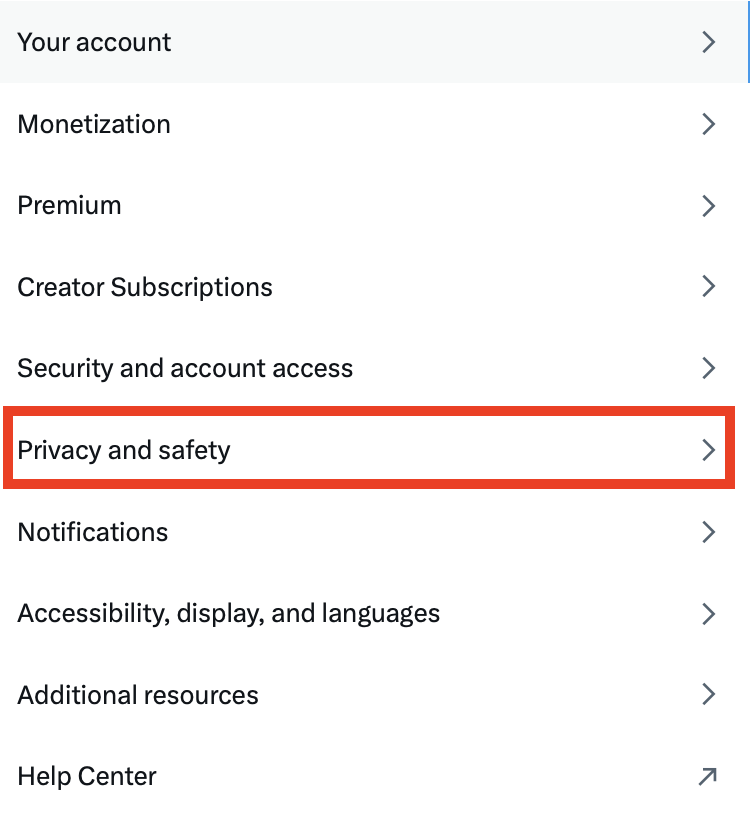
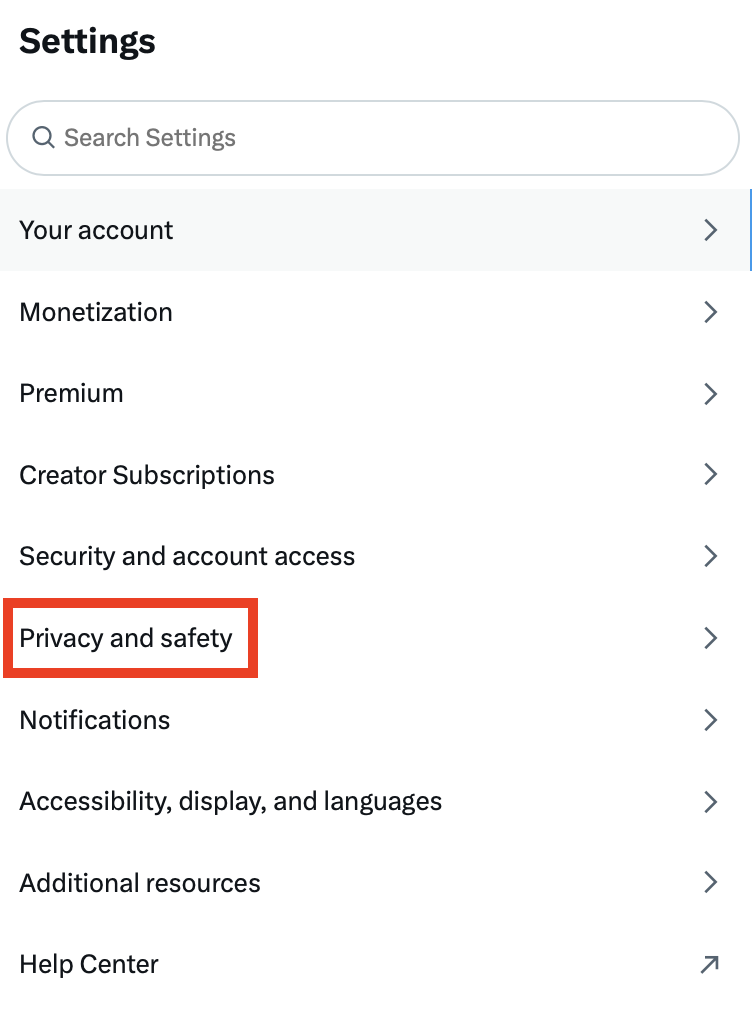
3. Click “Privacy and safety”
Click “Privacy and safety” from the menu in the center.
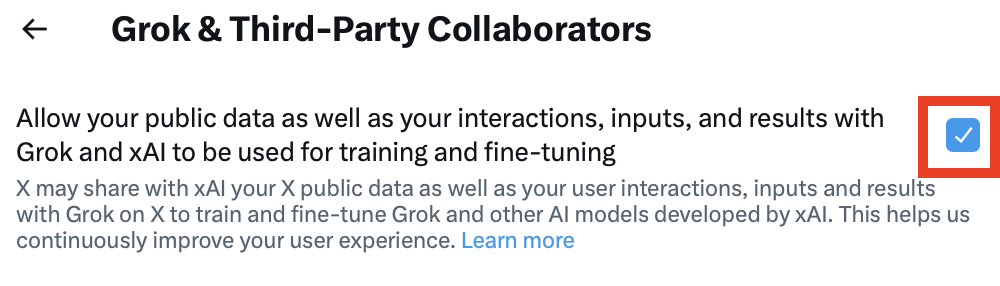
4. Select “Grok & Third-party collaborators”
Scroll until you see ‘Data sharing and personalization’ on the right.
Click “Grok & Third-party Collaborators.”
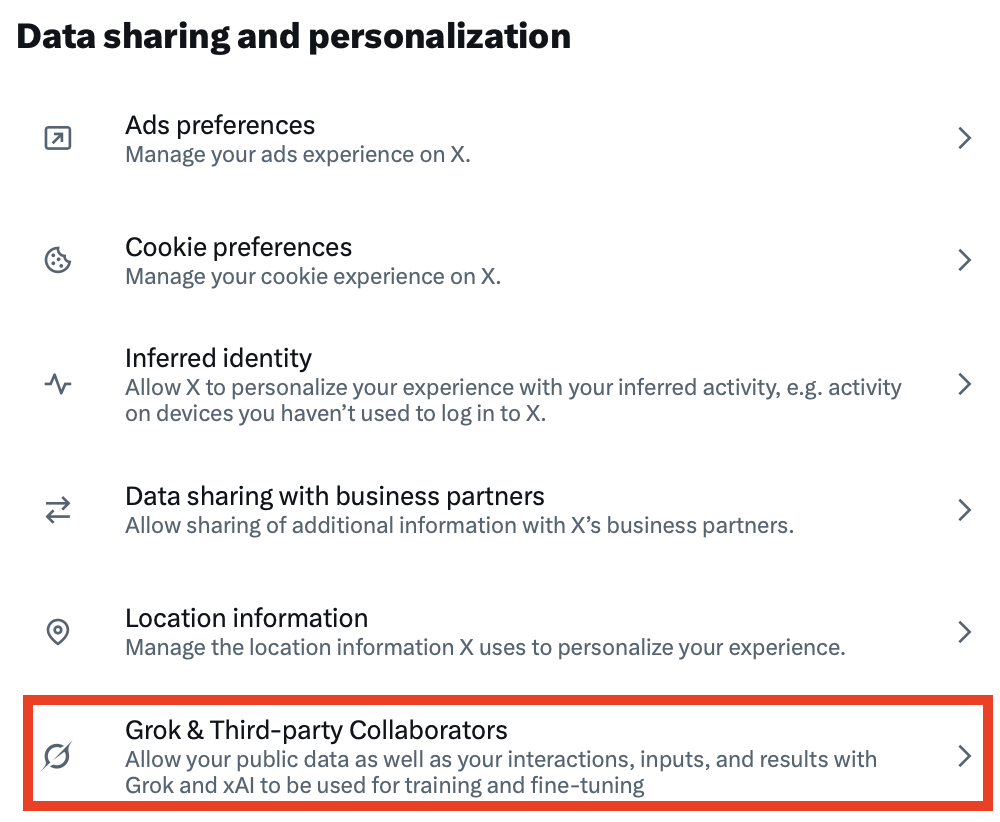
5. Uncheck the box next to ‘Allow your public data as well as your interactions, inputs, and results with Grok and xAI to be used for training and fine-tuning’
Untick the checkbox beside the setting ‘Allow your public data as well as your interactions, inputs, and results with Grok and xAI to be used for training and fine-tuning.’
That’s it!

Grok will no longer use your X public data for AI model training.
How to Opt Out of Grok Personalization Using X
If you have the personalization setting on, then X uses what it knows about you to tailor Grok’s responses to you specifically.
Whereas the training opt-out above protects against your data being used to train future AI models, the personalization opt-out below protects against X building and using a detailed profile of you in the present to personalize its responses to you.
1. Click your profile name and “Settings”
In your Grok account, click your profile name in the bottom left side.

A pop-up menu will appear. Select the “Settings” link.

2. Click “Data controls”
Select “Data controls” from the left side menu.

3. Toggle off ‘Personalize Grok using X’
Check if the toggle next to the ‘Personalize Grok using X’ setting is on or off.
If the setting is toggled on, toggle it off.

That’s it!

Grok will no longer use your data to tailor its responses to you.
How to Opt Out of Grok Using Your Conversation History for Personalization
If you’ve enabled Grok to use your past conversations with it to personalize your experience, then it will remember details from these past conversations.
Here’s how you can turn this setting off.
1. Click your profile name and “Settings”
In your Grok account, click your profile name in the bottom left side.
A pop-up menu will appear. Select the “Settings” link.
2. Click “Data controls”
Select “Data controls” from the left side menu.
3. Toggle off ‘Personalize Grok with your conversation history’
Check if the toggle next to ‘Personalize Grok with your conversation history’ setting is on or off.
If the setting is toggled on, toggle it off.

That’s it!

Grok will no longer use your conversation history to personalize its response to you.
How to Use Private Chat for Sensitive Conversations
If you want to keep memory on for everyday use but keep certain conversations off the record, you can have a Private Chat in Grok.
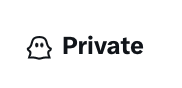
All you need to do to start a Private Chat is go to your Grok account and click the ghost icon in the top right corner.
That’s it!
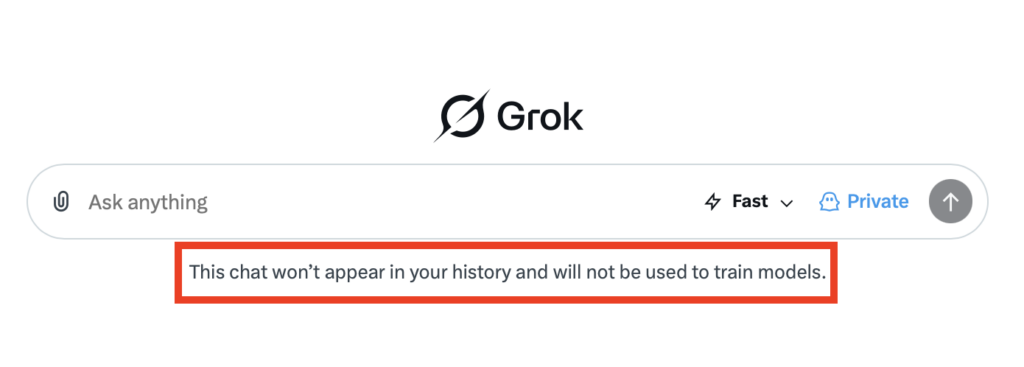
Private Chats won’t show up in your Grok history and will not be used to train AI models.
How to Make Your X Posts and Account Private
Switching your X account to private (protected) is a broader privacy move that also helps with AI training. X’s current policy excludes data from private accounts from AI training and from Grok’s image “remix” tools.
Here’s how you can make your X account private.
1. Go to your X account
Go to https://x.com/.
Sign in to your X account.
2. Click “More” and “Settings and privacy”
From the menu on the left side, click the “More” link.
Then, click “Settings and privacy.”

3. Click “Privacy and safety”
From the menu in the middle of the screen, select “Privacy and safety.”
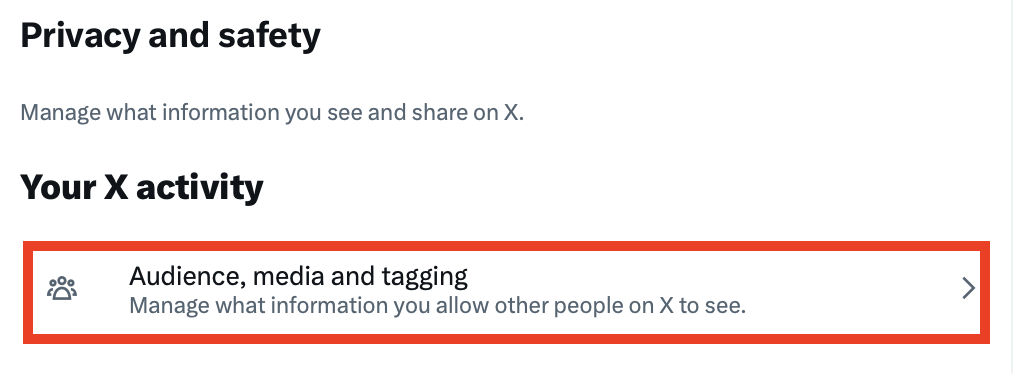
4. Click “Audience, media and tagging”
From the menu on the right side, select “Audience, media and tagging.”
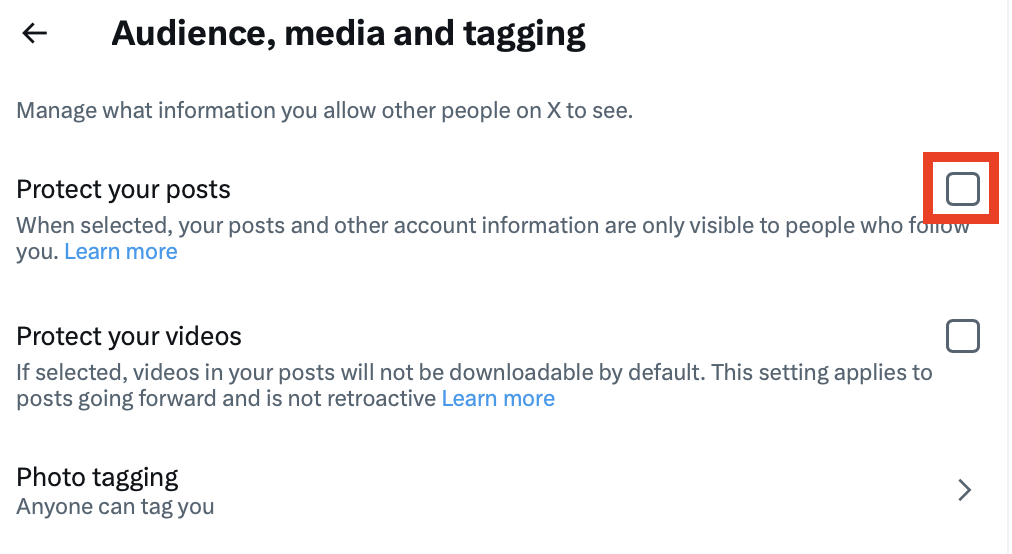
5. Check the box next to ‘Protect your posts’ and ‘Protect your videos’
Check the box beside ‘Protect your posts.’
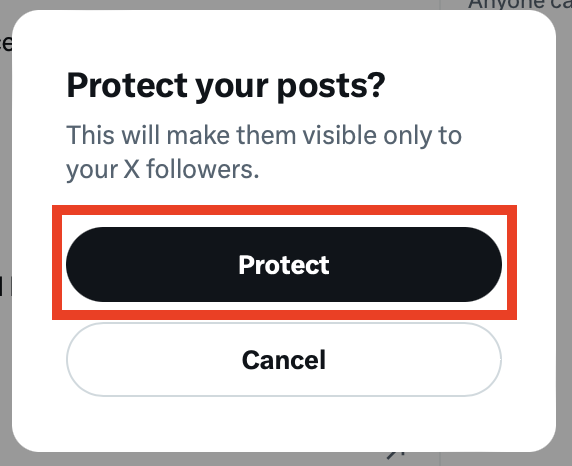
A pop-up window will appear, warning you that this will make your posts only visible to your X followers.
Click the “Protect” button.
Do the same for ‘Protect your videos.’
That’s it!
Once your account is private, your posts will only be visible to your approved followers and will be kept out of the pool of data used to train Grok and xAI’s models.
Note: A protected account is not publicly visible, so this option suits people who use X mainly to read and to interact with a known circle rather than to post publicly.
How to Stop Grok from Modifying Your X Content
X rolled out image features that let Grok “reimagine” or edit images, including ones that other users have posted.
Luckily, you can reduce the chance of your photos being edited or remixed by strangers through Grok.
Making your account private (as per above) will do this automatically, since private accounts are excluded from these tools entirely.
For individual public posts, X added a toggle to block Grok from editing that image, but at present it has to be applied per post when you upload it, rather than as a single account-wide switch. If you post images publicly, get in the habit of checking that option each time.
Here’s how to apply the toggle.
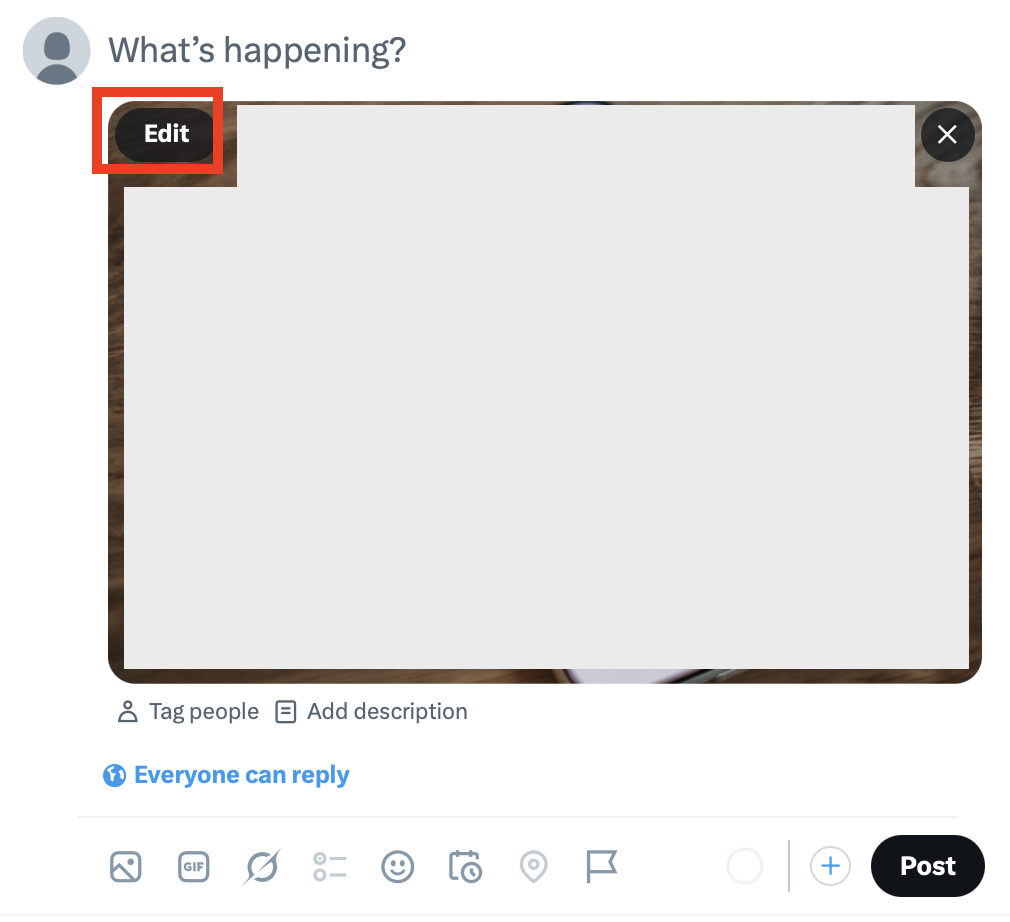
1. Click the “Edit” button when you’re uploading content
When you’re uploading content to your X account, click the “Edit” button.
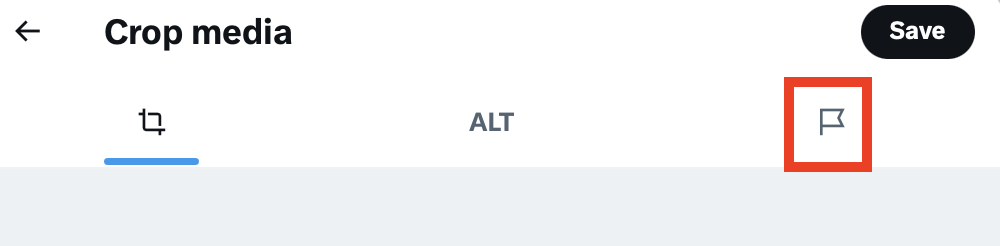
2. Click the flag icon
Select the flag icon from the top menu.
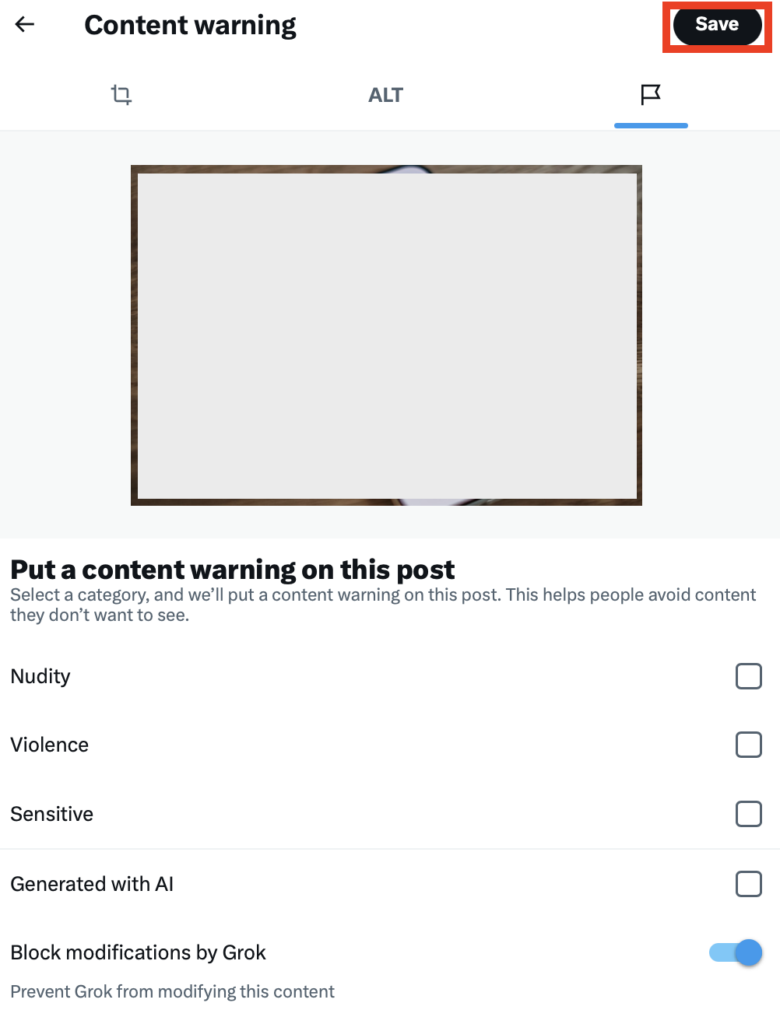
3. Toggle on ‘Block modifications by Grok’
Turn the toggle on next to the ‘Block modifications by Grok’ setting.

After you toggle the setting on, click the “Save” button at the top.
That’s it!
This content will not be modified by Grok. Just make sure to also set the toggle to on for every other content piece you upload to your X account.
How to Delete Your Grok Conversation and Imagine Post History
You can delete all your Grok conversation history in one go. Grok removes deleted conversations from its systems within 30 days of your deletion request (except if the company has to delete your conversation history for legal or security reasons).
1. Click your profile name and “Settings”
In your Grok account, click your profile name in the bottom left side.
A pop-up menu will appear. Select the “Settings” link.
2. Click “Data controls”
Select “Data controls” from the left side menu.
3. Click “Delete” beside ‘Delete All Conversations,’ and then click “Are you sure?”
Scroll to the bottom.
Click the “Delete” button next to ‘Delete All Conversations.’

The button will change to “Are you sure?”
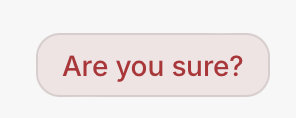
Click it.
4. Click “Delete” next to ‘Delete All Imagine Posts’ and “Are you sure?”
While you’re here, also click the “Delete” button next to ‘Delete All Imagine Posts’ (under the ‘Delete All Conversations’).

Again, click the “Are you sure?” button.
This will delete all of your Grok Imagine image and video posts.
That’s it!
How to Turn Off Grok Chat Link Sharing
“Allow chat link sharing” is a toggle that governs the Share feature, which generates a public URL for one of your conversations.
When it’s turned on, you can click “Share” on a chat, and Grok will create a link that anyone with the URL can use to view the full conversation without needing an account.
The setting made the news in 2025 when it turned out that shared links weren’t just private-by-URL. Grok’s Share feature created publicly indexable URLs with no noindex tags and no warnings, and Google, Bing, and DuckDuckGo indexed hundreds of thousands of them.
Here’s how you can turn this setting off.
1. Click your profile name and “Settings”
In your Grok account, click your profile name in the bottom left side.
A pop-up menu will appear. Select the “Settings” link.
2. Click “Data controls”
Select “Data controls” from the left side menu.
3. Toggle off ‘Allow chat link sharing’
Check if the toggle next to the ‘Allow chat link sharing’ setting is on or off.
If the setting is toggled on, toggle it off.

That’s it!

How to Review and Delete Shared Grok Links
After you toggle the “Allow chat link sharing” setting off, make sure you also unshare any Grok conversation links you’ve shared in the past.
1. Click your profile name and “Settings”
In your Grok account, click your profile name in the bottom left side.
A pop-up menu will appear. Select the “Settings” link.
2. Click “Data controls”
Select “Data controls” from the left side menu.
3. Click “Manage” next to ‘See Shared Links’
Scroll until you see ‘See Shared Links.’
Click the “Manage” button beside it.

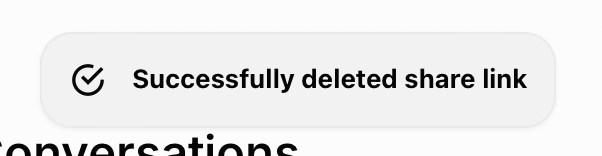
4. Click “Unshare”
Select the “Unshare” button next to the shared conversation you’d like to unshare.

That’s it!
You will see a pop-up message that says “Successfully deleted share link.”
How to Review and Delete Grok Files and Assets
In Grok, uploaded files aren’t cleared when you delete your chat history.
There’s a separate setting to delete the files you’ve uploaded and the assets you received (i.e., AI-generated content).
Here’s where you can find it.
1. Click your profile name and “Settings”
In your Grok account, click your profile name in the bottom left side.
A pop-up menu will appear. Select the “Settings” link.
2. Click “Data controls”
Select “Data controls” from the left side menu.
3. Click “Manage” next to ‘See Files and Assets’
Scroll until you see ‘See Files and Assets.’
Click the “Manage” button beside it.

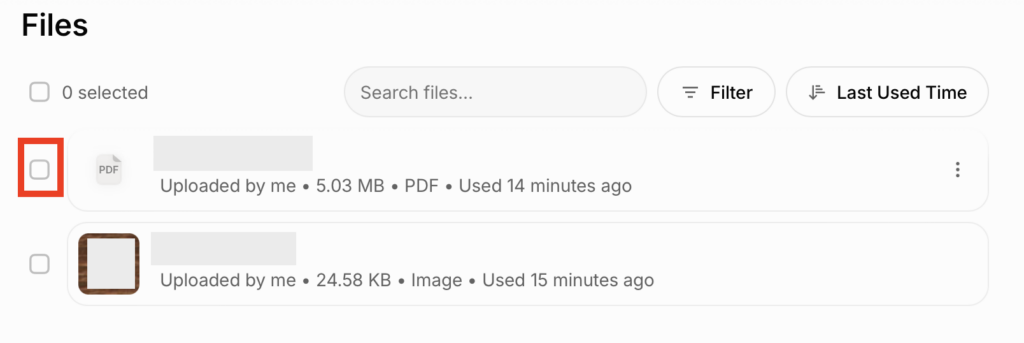
4. Tick the box next to the files and assets you want to delete
You will see a list of assets and files.
Tick the box next to the assets and files you want to delete.
5. Click “Delete” and then “Delete …” again
Select the “Delete” button.
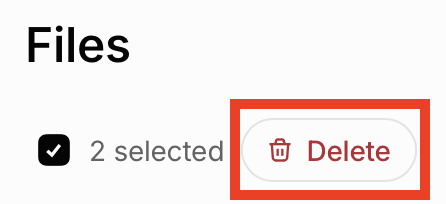
A pop-up window will appear, warning you that deletion can’t be undone.
Click the “Delete …” button.

That’s it!
Your files and assets have been deleted.
How to Manage Your Grok Cookie Settings
Grok’s cookie settings control the small tracking files that grok.com stores in your browser when you visit the site. This is separate from your conversation data and governs website tracking instead of what you’ve typed into Grok.
Here’s how you can turn off unnecessary cookies in Grok.
1. Click your profile name and “Settings”
In your Grok account, click your profile name in the bottom left side.
A pop-up menu will appear. Select the “Settings” link.
2. Click “Data controls”
Select “Data controls” from the left side menu.
3. Click “Manage” next to ‘Cookie Settings’
Scroll until you see the ‘Cookie Settings’ setting.
Click the “Manage” button beside it.

4. Toggle off unnecessary cookies
A ‘Privacy Preference Centre’ pop-up will appear.
Toggle off all unnecessary cookies.
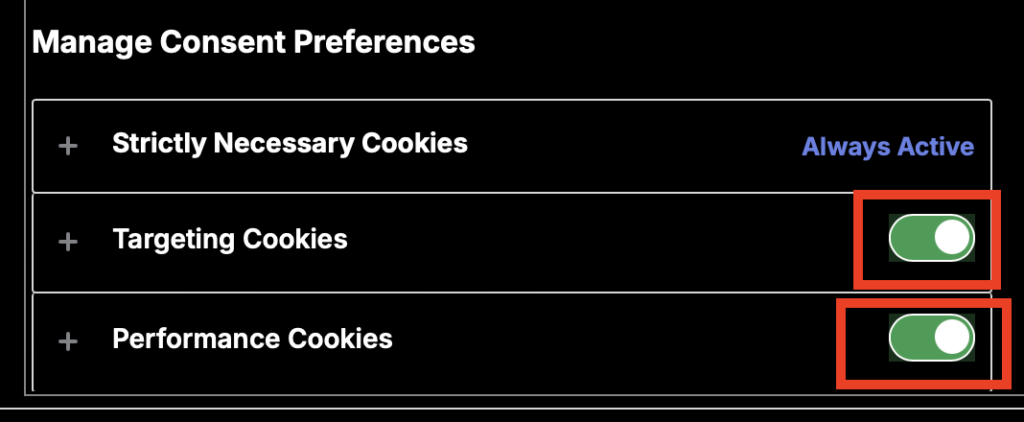
Then, click the “Confirm My Choices” button.
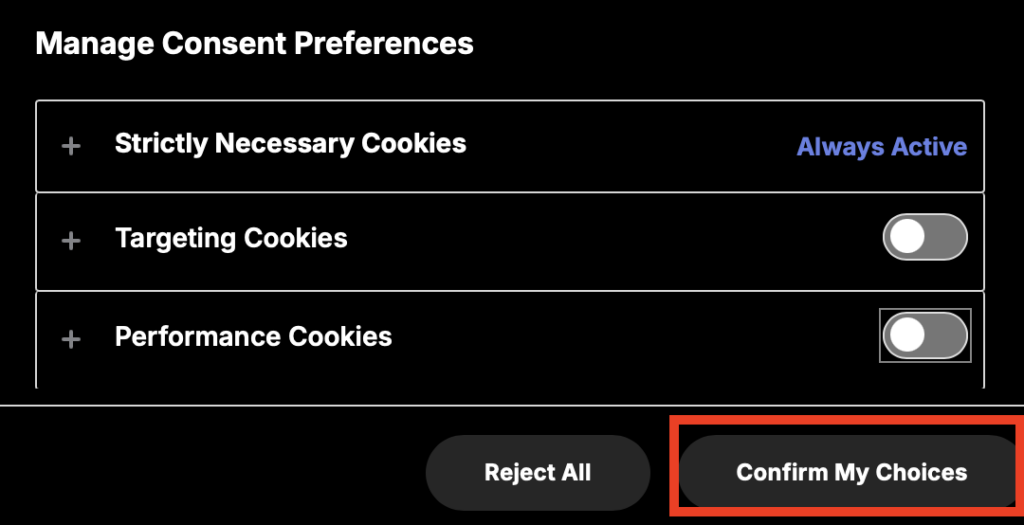
That’s it!
You’ve toggled off unnecessary cookies.
How to Export Grok Account Data
The best way to improve your Grok privacy is, of course, to delete your Grok account. However, before you do that, you may want to export your Grok account data.
Here’s how.
1. Click your profile name and “Settings”
In your Grok account, click your profile name in the bottom left side.
A pop-up menu will appear. Select the “Settings” link.
2. Click “Data controls”
Select “Data controls” from the left side menu.
3. Click “Export” next to ‘Export Account Data’
Scroll until you see the ‘Export Account Data’ setting.
Click the “Export” button beside it.

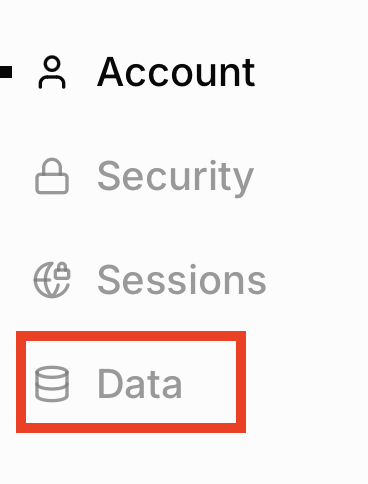
4. Click “Data”
You will be redirected to another page.
Select the “Data” link from the menu on the left side.
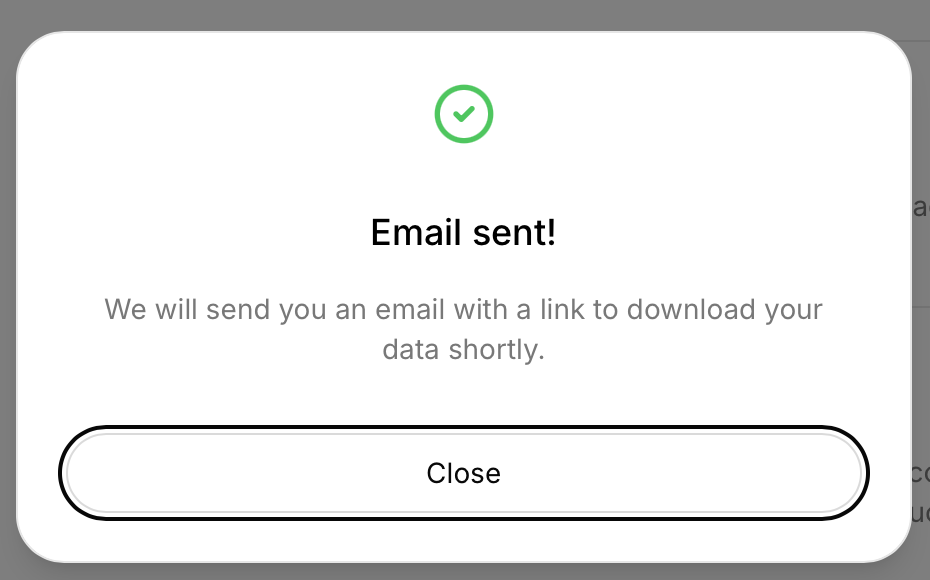
5. Click “Download” next to ‘Download account data’
Select the “Download” button beside the ‘Download account data” setting.

A pop-up message will appear, notifying you that an email with a link to download your Grok data has been sent to your address.
6. Go to your email inbox and click “Download data” in the email from X
Go to the email associated with your Grok account.
Find the email from X and click the “Download data” link within it.
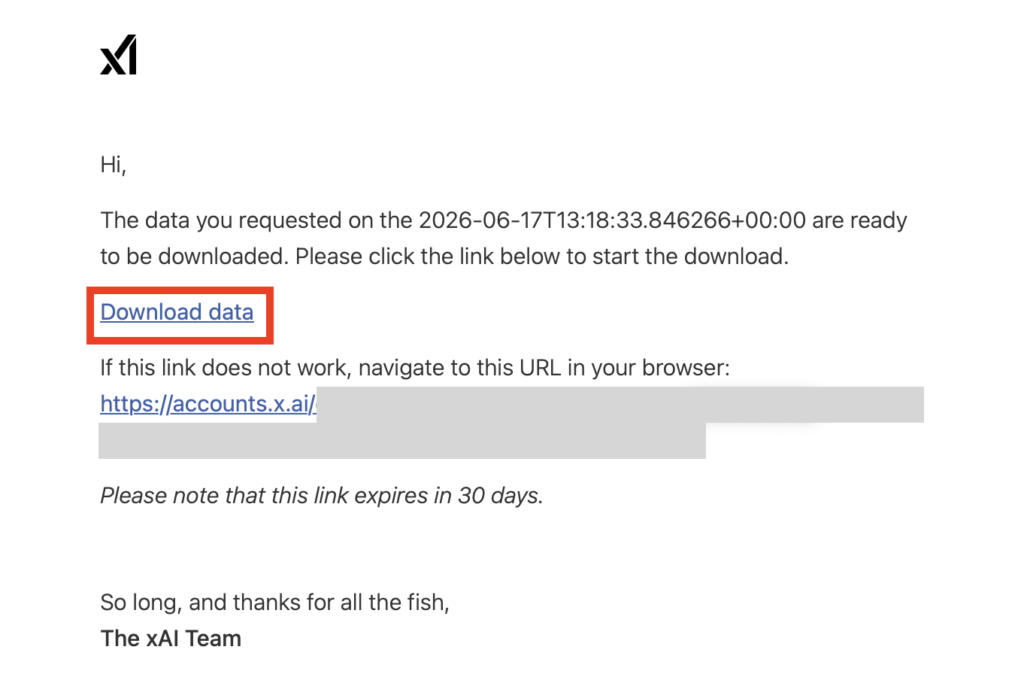
Note: The link will expire in 30 days. After the 30 days, you will need to request your data again.
After you click the link, you will be redirected to a page where your download will start.
That’s it!
How to Delete Your Grok Account
Ready to delete your Grok account?
Here’s how.
1. Click your profile name and “Settings”
In your Grok account, click your profile name in the bottom left side.
A pop-up menu will appear. Select the “Settings” link.
2. Click “Data controls”
Select “Data controls” from the left side menu.
3. Click “Delete” next to ‘Delete Account’
Scroll to the very bottom.
Click the “Delete” button beside the ‘Delete Account’ setting.

4. Click “Data”
You will be redirected to another page.
Select the “Data” link from the menu on the left side.

5. Click “Delete” next to ‘Delete account’
Select the “Delete” button beside the ‘Delete account’ setting.

6. Type in your email and click “Delete”
A pop-up window will appear, warning you that deleting your Grok account will result in the deletion of all your data associated with xAI.
Type in your email address associated with Grok.
Then, click the “Delete” button.
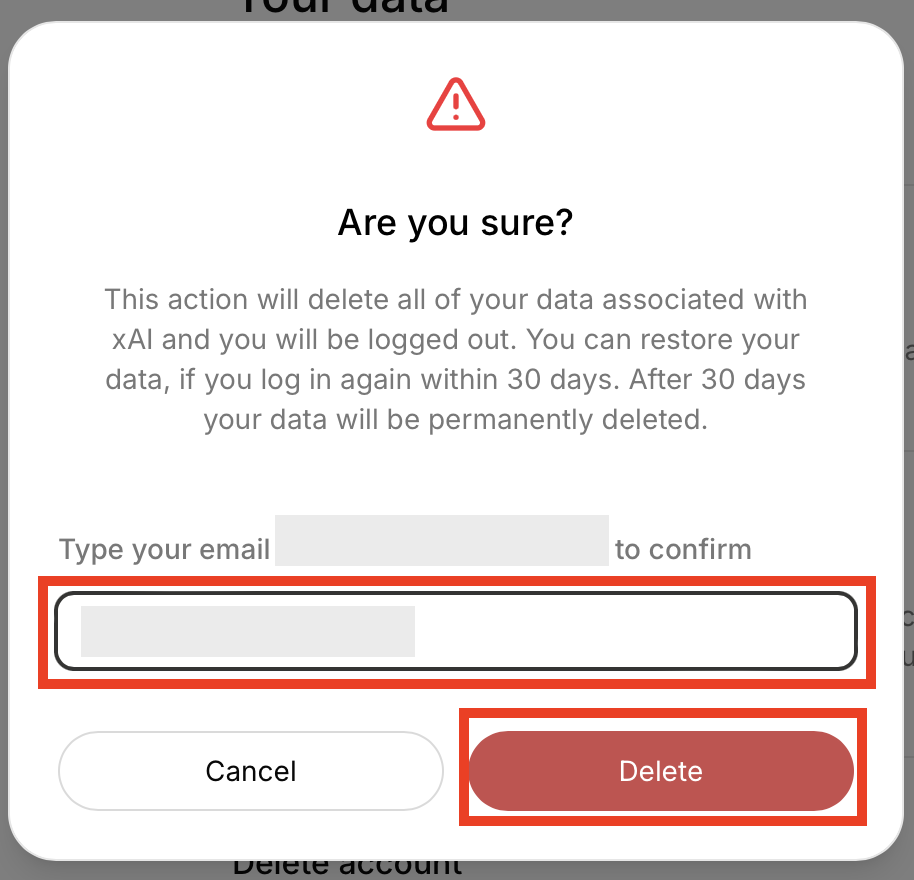
That’s it!
You will get an email from X saying that your Grok account has been marked for deletion and that your data will be deleted permanently from its systems within 30 days.
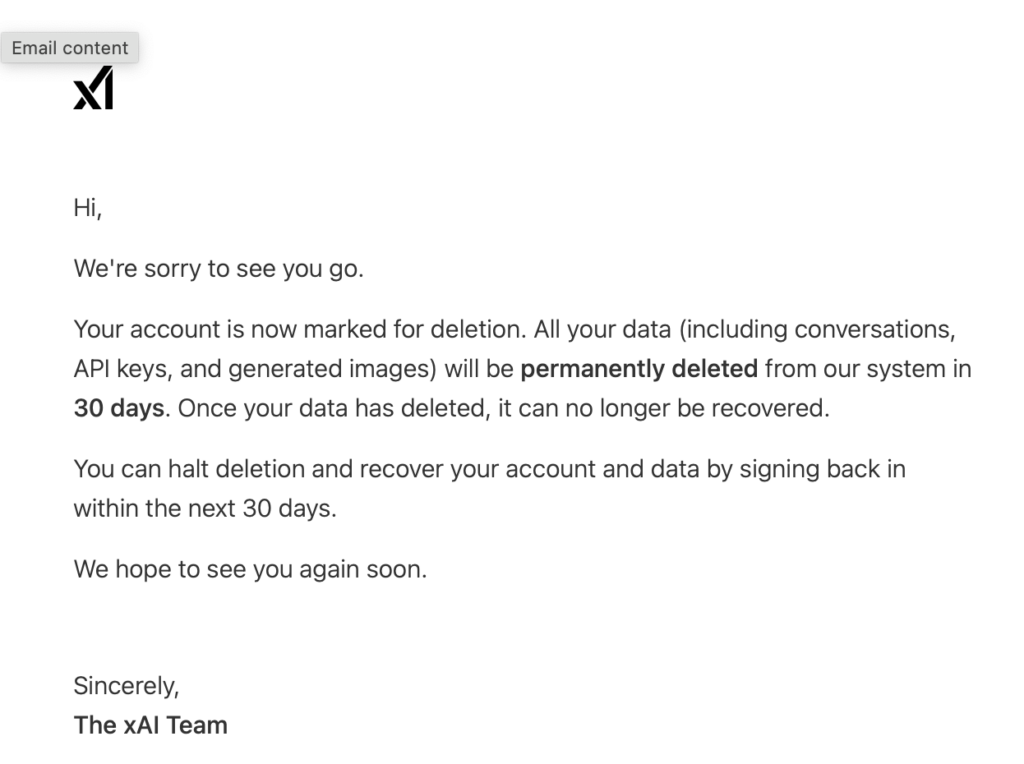
Note: You can restore your account and data if you log in again within 30 days of deleting your Grok account.
Don’t Forget Data Brokers and People Search Sites
After you adjust your Grok privacy settings, you should also take the time to opt out of data brokers and people search sites.
- Adjusting your Grok privacy settings improves your privacy by stopping your posts and chats from being used to train the model, keeping Grok from building a profile of you, and giving you control over what it stores and remembers.
- Opting out of data brokers and people search sites minimizes how much of your personal information is available to anyone online.
Data brokers and people search sites are companies whose business model is to collect people’s data from sources such as public records and social media, then share it in the form of comprehensive profiles.
These profiles can include details like your full name, where you live, your phone number, your education and employment history, your email address, and who you’re related to. Anyone can find this data, often with a simple Google search.
Most people have no idea their personal information is so easily findable and accessible to just about anyone.
The good news is that you can remove it by opting out. See our step-by-step data broker and people search site opt-out guides for instructions on how to do so.
You’ll probably need to opt out of the same data broker and people search site more than once, though. That’s because these companies relist your data as soon as they find more of it. As a result, if you notice that your profile has been republished, you’ll need to send another opt-out request.
Alternatively, you can subscribe to a data broker removal service like DeleteMe, which will do the above on your behalf.

news?

Don’t have the time?
DeleteMe is our premium privacy service that removes you from more than 750 data brokers like Whitepages, Spokeo, BeenVerified, plus many more.
Save 10% on DeleteMe when you use the code BLOG10.
Related Posts


Julius AI Data Privacy Settings Guide

Microsoft Copilot Privacy Settings Guide